Abstract-- Wiimote Whiteboard
The Information and Communication Technology (ICT) has a key role in schools and teaching methods. The use of interactive whiteboards is one of the technologies that have increased in the last years. Now students make notes in digital format instead of the notebook, allowing greater sharing of resources and
ideas between students and teachers. However, the solutions offered by major manufacturers have a high price, limiting access to these resources to a large number of educational institutions, so it is necessary found cheaper solutions. One such solution is the Wiimote Whiteboard presented by Johnny Lee that allows anyone to have a low cost interactive whiteboard using only the Wiimote and an infra-red emitter. Based on this technology, we developed three applications to
support classes for use in combination with the Wiimote Whiteboard. These applications will be described, showing the main differences for identical solutions in the market, as well a new way developed to control the computer at distance.
Introduction
What if you could turn each of your existing labs with ceiling mounted projectors into interactive smartboards? And what if you could do it for around $55?
Parts needed:
A Nintendo Wii controller ($39.99)
A USB to Bluetooth adapter ($12.99)
Momentary pushbutton switch (~$1.00)
Infrared LED (~$1.00)
Used dry erase marker (practically free)
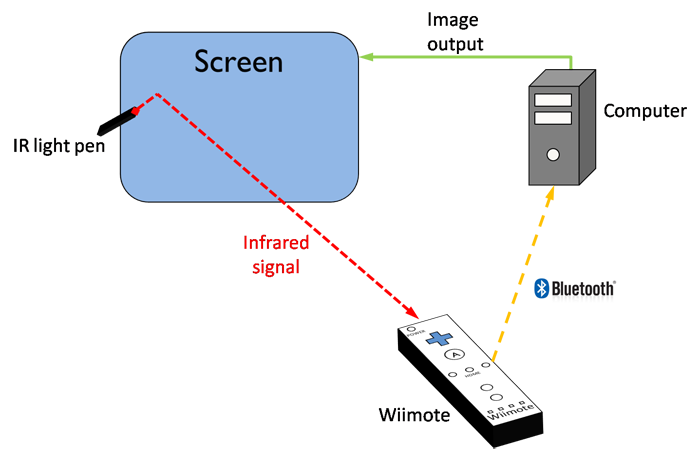
The Nintendo Wii controller is a bluetooth enabled device that has an infrared sensitive camera in it's tip. You can pair it with a bluetooth capable computer, or use a USB to bluetooth adapter if your computer does not have bluetooth built in.The LED, switch, and dry erase marker will be used to create a pen input device that emmits infrared light when the switch is depressed. Using the two, the Wii controller will be able to detect the location of the pen tip and transmit that data to a computer. Using some special software, detection of the infrared light will be translated as a mouse button press.
Parts constructionUnfortunatly, I didn't take any photos during the main construction of the pen, but it's not a difficult device to understand.
Here's a wide shot of the completed pen for reference:

A closeup shot next to a AA battery for size. Inside the pen is a single AA battery for power.

A closeup of the LED and switch. I used some epoxy at the base of the LED to make it a bit more stable.

Other Parts
Here's the USB bluetooth adapter I'm using, a Trendnet TBW-105UB. This particular model cost $12.99 from Newegg, but there are cheaper versions out there that are just as effective. Again, next to a AA battery for size comparison.

Finally, here's a Nintendo Wii controller, commonly refered to as a wiimote.

Software SetupThe hardest part of this project was actually getting the wiimote to communicate with the PC effectively. After a couple days of frustration, I learned there was a driver update for my adapter that ended up immediately solving my problems. If you plan on tackling this, I'd recommend doing a small bit of research if you need to purchase an adapter of your own, just to make sure it will work for you.
Once the drivers were installed, I had a new area called "My Bluetooth Places".

I click "Add a Bluetooth Device" in the left menu.
At this stage, I need to put my Wii controller in pairing mode so my PC can find it. Do this by holding down the 1 and 2 buttons at the same time. All four LEDs at the bottom of the remote will start to flash. Once the controller is in pairing mode, I pressed Next.

The PC has detect the Wii controller. I selected it from the list of found devices and clicked Next.

Many, if not most, bluetooth devices require a security code to pair. The Wii controller does not, so I just clicked the Skip button to continue.

A list of services offered by the newly discovered bluetooth device is listed. The Wii controller is detected as a generic HID device (Human Input Device). I check the box for that service and clicked Finish.

Now my Wii controller show up in my list of devices with a double green arrow overlaid to signify that the two are paired.

Using a downloaded test program, I coul verify that the PC is detecting my Wii controller properly. I selected my unit on the left, and then set Mode to "Wii Remote with Motion & IR".
In this shot, I'm holding down the B button (trigger button on the bottom of the Wii controller). It shows my battery status, as well as motion data grabbed from the controller in real time.

Now that there's a solid connection to the Wii controller, it's possible to move on to the Wiimote Whiteboard, also free and downloadable.

Position the Wii controller a few meters away and off to one side of your projected image. Here, I'm about 3 meters away and at just about a 45 degree angle. The controller will rest here for the duration of use.

Further:Before thinking of something like this for full time use, there are a few things that you'll need to consider.
The Wii controller normally operates off two AA batteries, and, when used with the actual Nintendo Wii, recieves a signal to power down at the appropriate time. Since we're not using an actual Wii, the controller never receives that signal and will stay on forever until you turn it off. Since there's no off switch on the controller, you pretty much are left with removing the batteries. However, there are accessories you can purchase for the controller that allow it to be powered by a USB conection, eventually making it possible to attach to a wall socket, lending to the idea of installing the controller as a permenant fixture.
Also, in my use I have to re-pair the controller to the PC after every boot. It's not terribly difficult, but a little awkward.
As for the pen, I'm happy with mine as a first attempt, but there are a couple of improvement to make there. I'm working on mounting the momentary switch directly below the LED so the light will come on when you put pressure on, like when writing on the board. It would also be nice if mine had an easily replaceable battery and LED, instead of guts of duct tape and solder.
PPT
Documentation:
Refer:
No comments:
Post a Comment